Types of Weather Stripping
Different areas of your garage door require different types of seals. Here's what each type does and where it goes:
1. Bottom Seal (Door Sweep)
The bottom seal attaches to the bottom edge of your garage door and creates a seal against the garage floor. It's the most important weather seal because it handles the most wear and blocks the largest gap.
- U-shaped seal: Best for uneven floors, flexible rubber hugs floor contours
- Bulb seal: Round profile, excellent for smooth concrete floors
- T-end seal: Standard replacement for most residential doors
- Brush seal: Allows drainage while blocking debris, good for shops
2. Side Seals (Jamb Seals)
Side seals attach to the door frame (jamb) and press against the door edges when closed. They block horizontal drafts and light.
- V-strip (vinyl): Most common, affordable, easy to install
- Bulb seal: Better compression, longer lasting
- Pile seal: Brush-style for very uneven gaps
3. Top Seal (Header Seal)
The top seal attaches to the header above the door opening. It's often overlooked but important for energy efficiency.
- Foam tape: Budget option, needs frequent replacement
- Rubber seal: Durable, 5-10 year lifespan
- V-strip: Works well for consistent gaps
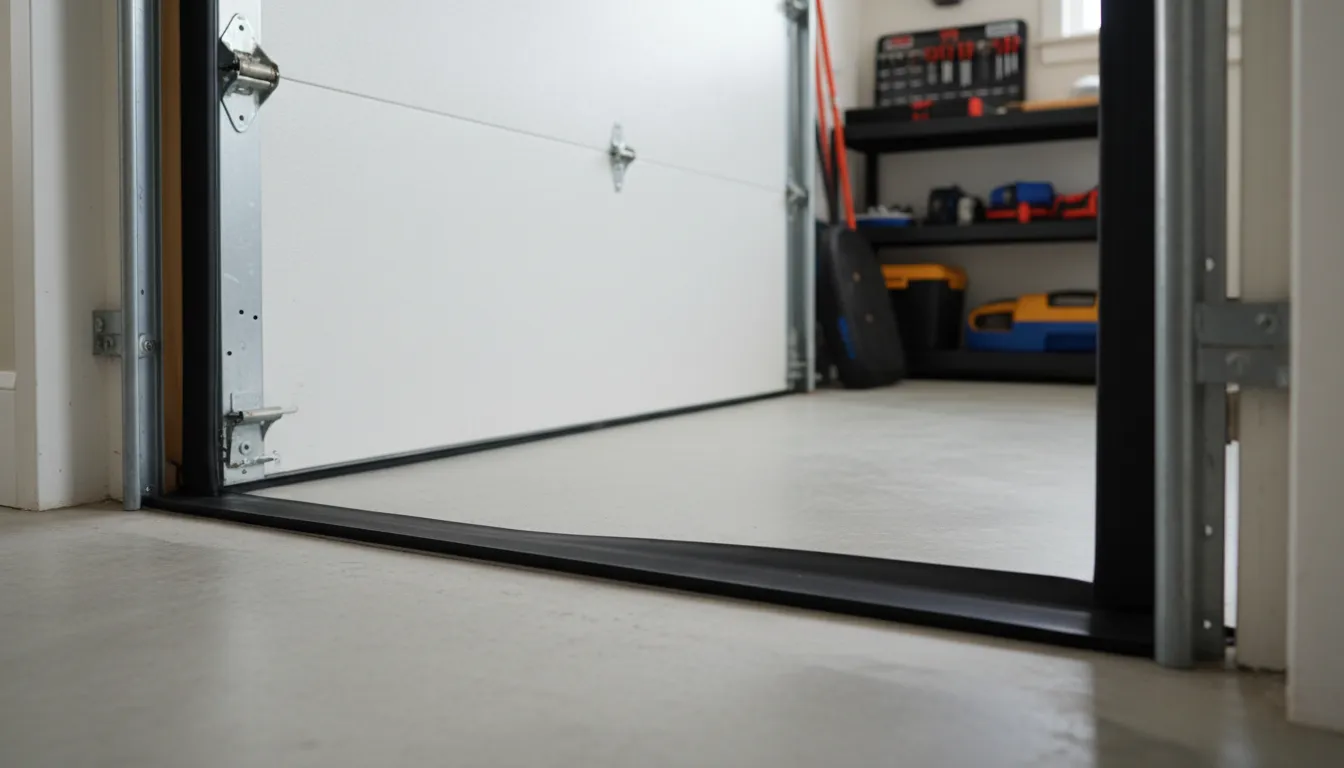
4. Threshold Seal
A threshold seal is an optional addition that mounts to the garage floor. It creates a raised barrier that the bottom seal presses against for a double seal.
Weather Stripping Costs
Here's what you can expect to pay for weather stripping materials and installation in Toronto:
| Type | Location | DIY Cost | Installed Cost |
|---|---|---|---|
| Bottom Seal | Door bottom | $30 - $60 | $80 - $120 |
| Side Seals (pair) | Door frame | $40 - $80 | $70 - $100 |
| Top Seal | Header | $20 - $40 | $50 - $70 |
| Threshold Seal | Floor | $40 - $80 | $80 - $120 |
| Complete Package | All areas | $100 - $150 | $150 - $250 |
Replacing all weather stripping at once saves on labor costs and ensures consistent protection. A complete package typically costs only $50-75 more installed than just a bottom seal.
Signs You Need New Weather Stripping
Check for these warning signs that indicate your weather stripping needs replacement:
- Visible light: You can see daylight around closed door edges
- Drafts: Cold air blows in during winter, even with door closed
- Water intrusion: Rain water gets in under or around the door
- Pest entry: Insects, mice, or leaves getting into garage
- Cracked/brittle seals: Rubber has hardened and cracked from age
- Flat or compressed seals: No longer bounce back to shape
- Missing pieces: Sections have torn off or fallen away
- Age: Seals are more than 5 years old
Benefits of Weather Stripping
Proper weather stripping provides these key benefits for your home and garage. For maximum energy efficiency, combine with garage door insulation:
Energy Savings
Reduce heating/cooling costs by 10-15% by sealing air leaks
Temperature Control
Keep garage 10-20 degrees more stable year-round
Pest Control
Block insects, mice, and other pests from entering
Water Protection
Keep rain, snow, and moisture out of your garage
Debris Blocking
Stop leaves, dust, and dirt from blowing in
Noise Reduction
Dampen street noise and door operation sounds
DIY Installation Steps
Weather stripping is one of the easier garage door DIY projects. Here's how to install each type:
Bottom Seal Replacement
Open Door & Remove Old Seal
Open the garage door fully. Remove the old seal by sliding it out of the track on the door bottom, or unscrewing the retainer if applicable.
Clean the Track
Use a brush or rag to clean debris from the seal track. Spray with silicone lubricant to make installation easier.
Measure & Cut New Seal
Measure your door width and cut the new seal 1-2 inches longer than needed. You can trim the excess after installation.
Slide in New Seal
Starting from one end, slide the new seal into the track. Work slowly to avoid kinking. Trim any excess from both ends.
Test the Seal
Close the garage door and check that the seal contacts the floor evenly across the entire width. Adjust door travel if needed.
Side Seal Installation
Side seals are even easier to install:
- Clean the door frame where the seal will attach
- Measure from floor to header and cut seal to length
- Peel adhesive backing (or pre-drill screw holes)
- Press seal firmly against frame, starting at top
- Close door to verify seal contacts door edge
If your garage door doesn't close evenly or has major gaps, weather stripping alone won't fix the problem. You may need track adjustment, spring balancing, or other repairs first.
Toronto Winter Weather Stripping Care
Toronto's harsh winters put extra stress on garage door weather stripping. Temperature swings from -20°C to +5°C cause materials to expand and contract, accelerating wear. Here's how to keep your seals working through Canadian winters:
Choose the Right Material
Not all weather stripping handles cold equally. EPDM rubber remains flexible down to -40°C, making it ideal for Toronto winters. Vinyl becomes brittle below -10°C and cracks easily. Foam tape fails fastest in freeze-thaw cycles. When replacing seals, always choose EPDM or high-quality rubber rated for cold climates.
Prevent Frozen Seals
The bottom seal can freeze to the garage floor during cold snaps, especially if there's moisture. Before winter, apply silicone spray lubricant to the bottom seal - this creates a barrier that prevents ice bonding. Avoid petroleum-based lubricants that can damage rubber. If your door does freeze to the floor, pour warm (not hot) water along the seal and wait before attempting to open.
Fall Inspection Is Critical
Inspect your weather stripping every September before the cold arrives. Look for cracks, gaps, compression, and brittleness. Replacing worn seals in fall is much easier than in January when materials are stiff and installation is difficult. A 30-minute fall inspection can prevent a frozen, drafty garage all winter.
Winter Maintenance Tips
- Clear snow and ice: Keep the area in front of the door clear to reduce moisture contact with seals
- Check for drafts monthly: Hold your hand near door edges on cold days to detect failing seals
- Re-apply lubricant mid-winter: Another coat of silicone spray in January helps maintain the anti-freeze barrier
- Don't force frozen doors: Forcing a frozen door tears seals and damages the opener
Need Professional Installation?
We install all types of weather stripping. Same-day service available.
Call 437-265-9995Frequently Asked Questions
DIY weather stripping materials cost $30-$150 depending on type and quality. Professional installation costs $150-$250 including materials and labor for a complete weather seal package.
Weather stripping should be replaced every 3-5 years, or sooner if you notice drafts, light gaps, water leaks, or visible damage like cracking, hardening, or gaps in the seal.
For bottom seals, U-shaped or bulb seals work best for uneven floors. For side and top seals, vinyl or rubber v-strips provide excellent insulation. EPDM rubber is the most durable material for Toronto's climate.
Yes, weather stripping is a DIY-friendly project. Bottom seals take 30-60 minutes to install. Side and top seals are easier and take about 20 minutes each. Basic tools like a screwdriver, utility knife, and measuring tape are all you need.
Yes, proper weather stripping can reduce garage temperature swings by 10-20 degrees and lower heating/cooling costs by 10-15%. It also keeps out dust, pests, leaves, and water.
The best time to replace weather stripping is early fall before Toronto's cold weather arrives. Installing in September-October ensures your garage is sealed before winter. Avoid replacing seals in freezing temperatures when materials are stiff and adhesives won't bond properly.
Quality weather stripping can help prevent freezing, but won't eliminate it completely. EPDM rubber seals resist freezing better than vinyl. Apply silicone spray to the bottom seal before winter to reduce sticking. If your door freezes, never force it open - you'll tear the seal.
In Toronto's climate with extreme temperature swings, weather stripping typically lasts 3-5 years. EPDM rubber seals last longest (5-7 years), while vinyl and foam seals may need replacement every 2-3 years. Annual inspection in fall helps catch wear before winter.