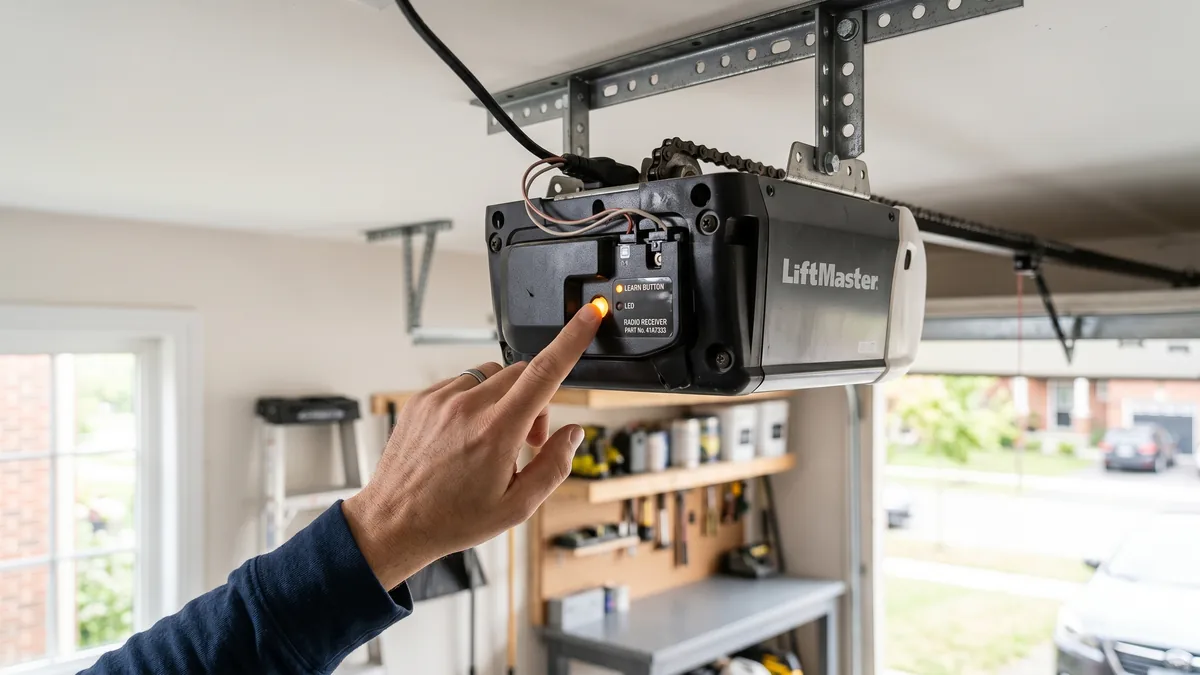
If your garage door opener will not learn the remote, the fix is almost always one of five things: a dead remote battery, a full opener memory, pressing the wrong button on the motor head, taking too long after pressing LEARN (you have about 30 seconds), or a frequency mismatch between an old remote and a newer rolling-code opener. Start by replacing the battery, clearing the opener memory, then reprogramming the remote within 30 seconds.
What Does "Learning" a Remote Mean?
Learning is the process where your opener's logic board stores a remote's unique code in memory so it recognizes that remote as authorized. You trigger it by pressing the LEARN button on the motor head, then pressing the remote button within a short time window. On modern Security+ openers, the remote and opener also "handshake" on a rolling code that changes after every use to prevent code grabbing.
A remote that suddenly stops programming is one of the most frustrating — and most fixable — garage problems we see across Toronto and the GTA. In 15 years of service calls, I’d estimate 8 out of 10 "won’t learn" complaints are solved without a single replacement part. This guide walks through every cause in the order a professional technician checks them, so you can fix it yourself before paying for a visit.
Step 1: Confirm the Opener Has Power and Works
Before blaming the remote, prove the opener itself is healthy. Press the hard-wired wall control button (the one mounted on your garage wall). If the door opens and closes normally from the wall button, the motor, springs, and travel are fine — the problem is isolated to the remote or the learning process. If the wall button does nothing either, you have a power or logic-board issue, not a programming issue.
- Check the outlet: Many ceiling outlets are switched. Confirm the opener is firmly plugged in and the outlet has power (test with a phone charger or lamp).
- Look at the LEARN indicator light: The small LED beside the LEARN button should glow steadily when the opener is powered. No light at all can mean a tripped GFCI, a blown internal fuse, or a dead board.
- Recent power surge? GTA thunderstorms and winter grid flickers are a common cause of fried logic boards. If the opener died right after a storm, suspect the board.
Step 2: Replace the Remote Battery and Use the Right Button
This is the single most common fix. A remote with a weak battery may still light up faintly but won’t transmit a strong enough signal for the opener to capture during learning.
Swap the battery first
Most visor remotes use a CR2032 or CR2016 coin cell, or sometimes a small A23 12V battery. Pop the case, replace the cell, and make sure the polarity is correct. Wipe the contacts — corrosion from a humid GTA garage is common. Then test the LED: it should glow bright and steady when you press the button.
Make sure you’re programming the correct button
On a multi-button remote, each button must be programmed separately to its door. If you accidentally programmed Button 1 to a neighbour’s door or to a different opener, pick a fresh, unused button. Many homeowners also confuse the remote’s buttons with HomeLink buttons built into a car visor — those program differently.
Step 3: Find the LEARN Button and Program Within the Time Window
The LEARN button lives on the motor head unit, usually near the antenna wire or hidden under the light-bulb lens cover. You will likely need a step ladder. On LiftMaster and Chamberlain openers it is a coloured square; the colour tells you which code format your opener uses, which matters for remote compatibility.
The standard learn procedure (LiftMaster / Chamberlain / Craftsman)
- Press and release the LEARN button. The LED beside it will light up or blink.
- Within 30 seconds, press and hold the desired remote button.
- The opener light will blink or you’ll hear a click when the code is accepted. Release the remote button.
- Test the remote. If it works, you’re done.
The 30-second window is the silent culprit behind many failures. If you climb down the ladder, walk to your car, and then press the remote, you’ve missed the window. Have the remote in hand before you press LEARN, or have a helper press it.
Programming a Genie or Overhead Door opener
Genie and Overhead Door (Genie-built) openers use Intellicode rolling-code technology and a button usually labelled LEARN CODE or PROGRAM, often a round button rather than a coloured square. The procedure is similar: press and release LEARN CODE, wait for the round LED to glow, then press the remote button twice within the time window. On Genie units the LED will flash to confirm the code was stored. If you have an older Genie screw-drive model, the receiver may be a separate plug-in box near the motor rather than built into the head — program the remote at that receiver.
Common mistakes that block programming
- Holding the LEARN button instead of releasing it. A quick press-and-release starts the 30-second learn window; holding it for 6+ seconds erases the memory instead. If your memory keeps getting wiped, you’re holding too long.
- Standing too far from the opener while programming. Although remotes have decent range, programming is most reliable within a few feet of the motor head.
- Interference from nearby electronics. LED shop lights, WiFi routers, and even a neighbour’s opener on the same frequency can swamp the weak signal during learning. Turn off LED garage lights while programming.
- Programming a remote that was already learned, then re-learned to a different opener. Some remotes only hold one rolling-code pairing per button at a time.
| LEARN Button Colour | Code Format | Approx. Years | Frequency |
|---|---|---|---|
| Green or Purple | Billion Code | 1993–1997 | 390 MHz |
| Orange / Red-Orange | Security+ | 1997–2005 | 315 / 390 MHz |
| Yellow | Security+ 2.0 | 2011–present | 310 / 315 / 390 MHz |
| Red, Grey, or no LEARN | DIP switch (fixed code) | Pre-1993 | 300–390 MHz |
If your opener has a yellow antenna and yellow LEARN button (Security+ 2.0) but your remote is an older orange-era model, they may simply refuse to pair. Matching the colour to a compatible remote solves it — more on that below.
Step 4: Clear a Full Opener Memory
Most residential openers store a limited number of devices — commonly around 50 remotes, keypads, and HomeLink units combined. If you (or previous owners) have programmed many devices over the years, the memory can fill up and reject new ones. The fix is to wipe everything and start fresh.
- Press and hold the LEARN button until the indicator LED goes out — usually 6 to 10 seconds.
- This erases every remote, keypad, and HomeLink device from the opener.
- Now reprogram each remote you actually use, one at a time, using the standard learn procedure above.
Step 5: Rule Out Frequency and Rolling-Code Mismatches
If the battery is fresh, the memory is clear, and you’re programming inside the time window, but the remote still won’t learn, you almost certainly have a compatibility problem. A remote and opener must agree on both the radio frequency and the code format.
Old fixed-code openers (pre-1993)
These use DIP-switch remotes — tiny banks of toggle switches inside both the remote and the receiver that must be set identically. There is no LEARN button. If your opener has DIP switches and no LEARN button, you set the remote switches to match the receiver. These openers also lack modern safety sensors and are well past their service life; replacing them is the safer choice.
Modern rolling-code openers (Security+ and Security+ 2.0)
Rolling-code technology changes the transmitted code after every press, so a generic or mismatched remote cannot pair. According to LiftMaster’s official programming documentation, you must use a remote that matches your opener’s colour-coded LEARN button or a universal remote certified for that security tier. Buying the manufacturer’s matching remote is the most reliable route.
Universal remotes (such as Genie, Chamberlain Clicker, or Skylink models) bridge many brands, but read the package: it must list your opener’s frequency and security level. A universal remote that only supports fixed codes will never learn a Security+ 2.0 opener.
Step 6: When It’s the Logic Board (and When to Replace the Opener)
If you’ve confirmed power, swapped the battery, cleared the memory, used a compatible remote, and stayed inside the time window — yet nothing learns — the fault is in the opener’s logic board (the receiver circuit). Tell-tale signs of a failing board include:
- The LEARN light won’t illuminate even though the wall button still operates the door.
- Remotes learn but randomly lose programming days later.
- The opener responds erratically, opens by itself, or the light blinks in a fixed pattern (a diagnostic code — check your manual).
- Visible scorch marks or a burnt-electronics smell after a power surge.
On openers more than 12–15 years old, a replacement board (when still available) often costs nearly as much as a new opener — and a new opener brings modern safety sensors, battery backup, and smartphone control. Royal Garage Doors supplies and installs a new LiftMaster, Chamberlain, or Genie opener from $630 + tax, including installation and programming. See our garage door opener repair page or the full pricing breakdown for details.
Quick Pre-Call Checklist
- Does the wall button operate the door? (Yes = remote/learn issue, not the motor.)
- Fresh battery in the remote, correct polarity, bright LED?
- Did you press LEARN and program within 30 seconds?
- Did you try clearing the full memory and starting over?
- Does the remote’s frequency/security level match the opener’s LEARN-button colour?
- Is the opener over 12–15 years old or storm-damaged? (Replacement likely.)
Remote Still Won’t Program?
If you’ve worked through every step and the opener still won’t learn the remote, the logic board may be failing. Royal Garage Doors diagnoses and repairs or replaces openers across Toronto & the GTA — with a FREE service call on any repair.
Call 437-265-9995