To replace a garage door glass insert, close the door, then unsnap the interior retainer frame that holds the decorative window in place (no screws on most modern doors). Lift out the cracked insert, measure the panel cutout to confirm size and pattern, order a matching replacement, then press the new insert into the exterior frame and snap the interior frame back on. The whole job takes 15–30 minutes per window with no tools beyond a putty knife and a step ladder.
What Is a Garage Door Window Insert?
A garage door window insert is a self-contained decorative window unit — glazing (acrylic, polycarbonate, or glass) surrounded by a two-piece plastic or aluminum retainer frame — that fits into a pre-cut opening in a sectional door panel. The exterior frame holds the glazing and the interior frame snaps onto it from inside the garage, sandwiching the steel panel between them. This modular design is why a single insert can be swapped without removing the door.
A cracked or foggy garage door window is one of the few repairs most homeowners can handle in an afternoon — provided you order the right insert. In this guide I'll walk you through identifying your window style, measuring correctly, and snapping in a clean replacement, plus the GTA-specific reasons these windows fail in the first place.
I'm Michael Thompson, an IDEA Certified technician with over 15 years installing and servicing doors across Toronto and the GTA. Window inserts are deceptively simple, but the calls we get usually come down to one mistake: someone ordered an insert that doesn't match the panel cutout or the door's decorative pattern. Get the measurement right and the rest is genuinely easy. Below is the exact process our crews follow.
Step 1: Identify Your Window Type and Pattern
Before you touch a screwdriver, figure out what you actually have. Garage door windows fall into a few categories, and the replacement path differs for each.
Snap-In Retainer-Frame Inserts (Most Common)
The vast majority of residential sectional doors built since the early 2000s use snap-together plastic retainer frames. From the outside you see a clean trimmed frame around the glazing; from inside the garage you see a matching frame with tabs that clip into the exterior half. These require no glazier and no panel removal — this guide is written primarily for them.
Screwed or Caulked Glass Lites
Older doors and some commercial units use real glass set into a frame fastened with screws and glazing tape or caulk. These are heavier, can use tempered glass, and are best handled by a technician because cutting old sealant and handling glass safely takes practice. If you have a commercial unit, our commercial garage door repair team handles these regularly.
Full-View Aluminum-and-Glass Doors
Contemporary full-view doors are an aluminum frame holding many glass panels. A single broken pane is replaced as a glass-only swap within that frame — a different job from a decorative insert. If you're weighing styles, our overview of overhead garage door types explains where full-view doors fit.
Step 2: Measure the Panel Cutout Correctly
This is where most DIY replacements go wrong. You do not measure the visible glass. You measure the rough opening that was cut into the steel panel, because that is what the retainer frame grips.
- Open or close the door so the windowed panel is at a comfortable height — usually closed, with you on a step ladder reaching the inside frame.
- Remove the interior frame first (see Step 3) so you can see the raw cutout edge.
- Measure the cutout width and height from steel edge to steel edge, in inches. Round to the nearest standard size.
- Measure the panel thickness / gauge. Insulated steel panels (1-3/8" to 2") use a different frame depth than single-layer panels. The insert must clamp the correct panel thickness.
- Confirm the decorative pattern and glazing type so the new window matches the others on the door.
Common North American sectional insert sizes include the dimensions below. Yours may differ — always trust your own cutout measurement over a generic chart.
| Insert Type | Typical Cutout Size | Common Use | Glazing |
|---|---|---|---|
| Standard short panel | 12" x 21" | 4-section single-car doors | Acrylic / glass |
| Standard long panel | 14" x 21" | Most residential doors | Acrylic / glass |
| Wide carriage-style | 16" x 27" | Carriage-house designs | Acrylic / glass |
| Square decorative | 21" x 13" | Modern flush doors | Acrylic / frosted |
| Full-view pane | Frame-specific | Aluminum full-view doors | Tempered / insulated glass |
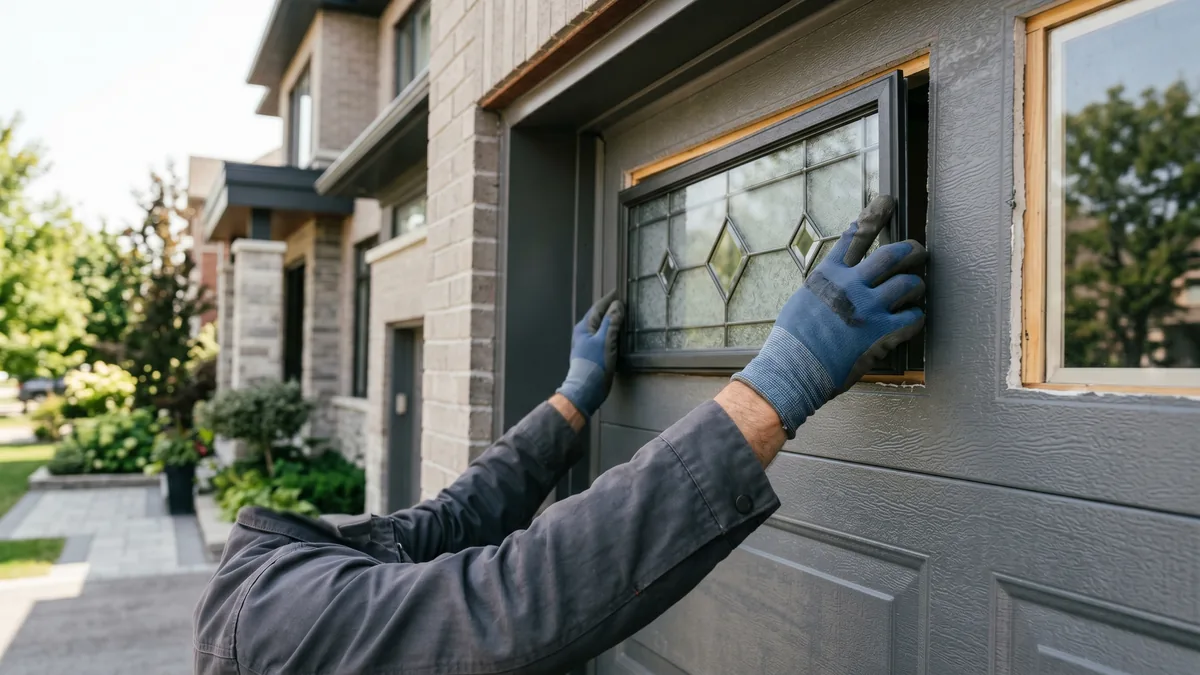
Step 3: Remove the Old Insert
With the right replacement in hand, you're ready to take out the damaged window. Work from inside the garage with the door closed.
- Find the seam where the interior retainer frame meets the panel. There is a slight lip all the way around.
- Pop a corner loose. Insert a plastic putty knife or trim tool into the seam at one corner and gently pry. The interior frame is held by snap tabs; it will release with steady pressure. Avoid metal pry bars, which scratch and bend the steel panel.
- Work around the perimeter releasing each tab until the entire interior frame lifts off.
- Support the glazing from outside as you free the last tabs so the cracked insert doesn't fall outward onto your driveway. If the glazing is already shattered, wear gloves and clear shards carefully.
- Lift out the old insert and the exterior frame as a unit. Clean any dust or old foam tape from the cutout edge.
Step 4: Install the New Insert
Installation is essentially the removal steps in reverse, and it's where the snap-fit design pays off.
- Seat the exterior frame with its glazing into the panel cutout from outside, making sure any "TOP" marking faces up and the decorative pattern is oriented correctly.
- Hold it flush against the exterior face of the panel.
- From inside, align the interior frame over the cutout and press it onto the exterior frame's tabs. You'll hear and feel them click.
- Work around the perimeter pressing firmly until every tab is engaged and the frame sits tight with no gaps.
- Check the seal. Run a finger around both sides. There should be no daylight gaps. Some inserts include a foam gasket; if yours did, make sure it seated evenly to keep out wind-driven rain and snow.
- Operate the door once and watch the new window through a full open-close cycle to confirm nothing rattles or shifts.
That's it. A clean snap-in replacement restores both the look and the weather seal of the panel. If your other panels are aging or the door's overall finish is dated, replacing one window can highlight that mismatch — in which case a new door or selective garage door panel replacement may make more sense than chasing individual windows.
Step 5: Costs and When to Call a Pro
Window inserts are inexpensive parts, which is what makes this a satisfying DIY project. Here's how the numbers typically break down in the GTA.
- Replacement insert (part only): roughly $40–$120 each depending on size, pattern, and whether it's acrylic or glass.
- Window inserts on a new door: if we build you a new door, decorative window inserts are $125 per section as an add-on. See current numbers on our pricing page.
- Professional swap on an existing door: usually a short service visit; the service call is free when bundled with other repair work.
You should bring in a technician when: the panel is bent or rusted around the cutout, the glazing is real glass set in caulk, you want to add windows to a solid panel (this requires precise cutting), or the window damage is part of larger door damage like dents or impact. In those cases a full garage door replacement often costs less over time than piecemeal fixes. Not sure which way to go? A reputable garage door company will give you an honest assessment rather than upselling.
Why GTA Windows Crack in the First Place
Across Mississauga, Brampton, and Vaughan, the leading cause of cracked inserts we see is thermal stress. When a heated garage interior meets a -20°C exterior, acrylic and glass expand and contract at the panel surface. If a retainer frame was clamped too tightly or the glazing had no expansion room, that stress concentrates and a crack starts at a corner. UV exposure on south-facing doors also makes older acrylic brittle over a decade. The fix is the same — a fresh insert — but choosing impact-rated acrylic or insulated glass and not over-tightening the frame reduces repeat failures. If your garage is heated, the CSA A440 standards for door and window performance set the framework Canadian manufacturers follow for thermal and air-leakage ratings. Our team serving garage door repair in Mississauga handles these seasonal cracks every winter.
Key Takeaways
Modern garage door windows are snap-in inserts you can replace yourself in 15–30 minutes. Measure the steel panel cutout (never the glass), match the pattern and panel thickness, unsnap the interior frame, swap the insert, and snap it back. Budget $40–$120 for the part. Call a pro for glass-in-caulk lites, bent panels, or adding new windows to a solid door.
Window Cracked or Hard to Reach?
If the panel is damaged, the glass is set in caulk, or you'd rather have it done right the first time, Royal Garage Doors swaps inserts and panels across Toronto & GTA — with a FREE service call on any repair.
Call 437-265-9995