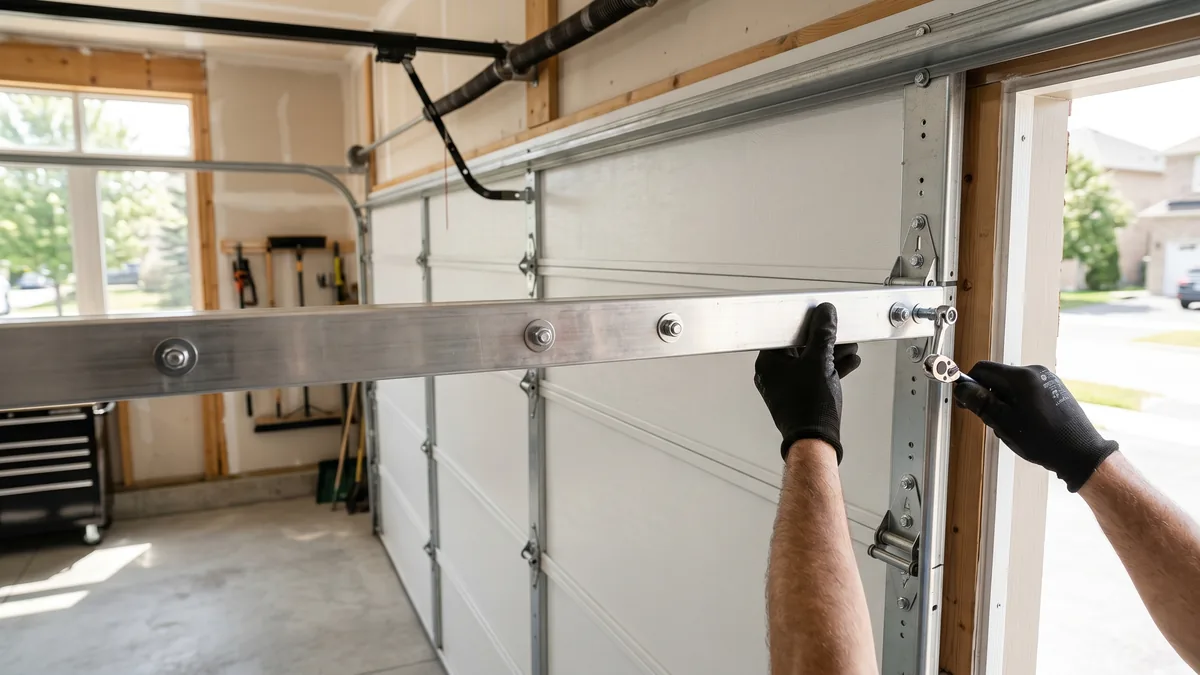
A garage door strut (also called a U-bar or strut bar) is a horizontal steel reinforcement bolted across the inside of a door section. It stops the panel from bowing under wind pressure and the concentrated pull of an automatic opener. You need a strut when the top section flexes or bows during opening, when an opener is fitted to a single-layer door, when the door is 14 ft wide or more, or when wind-load ratings require it. The top section is the most common location because that is where the opener arm applies force.
What Is a Garage Door Strut?
A garage door strut is a long, rigid bar of formed galvanized steel — usually a U-channel or box profile — that runs the full width of a door panel and screws into the vertical end stiles and intermediate stiles. Its only job is to add stiffness across the horizontal span so the section behaves like a rigid beam instead of a flexible sheet, keeping the door flat as it travels up and down.
Across Toronto and the GTA, I see the same scene constantly: a homeowner installs a new opener on an older single-layer door, and within weeks the top edge starts visibly bending as the opener heaves the door upward. The fix is almost always a strut — one of the cheapest, most overlooked pieces of hardware on the entire door. This guide explains exactly when reinforcement is needed, how many struts to add, how to size them, and where the line is between a safe DIY job and a call to a technician.
What a Strut Actually Does
A garage door section is essentially a wide, thin panel. On its own it can carry vertical loads (its own weight, hanging from the rollers) reasonably well, but it is weak against two specific forces:
- Opener pull force: An automatic opener attaches to the door with a single arm at the top-center of the top section. When it lifts a 100–200 lb door, all of that starting force concentrates at one point. Without reinforcement, the top panel bows outward in the middle — you can literally watch it flex on each cycle.
- Wind and pressure loads: A large door face acts like a sail. Positive and negative wind pressure tries to push the panel in or suck it out. A strut turns the panel into a beam that spans the opening and resists that bending.
By adding a strut, you spread these point and surface loads across the whole width of the section. The panel stays flat, the rollers track evenly, and the opener does not have to fight a flexing door — which means less strain on the opener gears and motor. If your opener has been straining or short-cycling, a missing top strut is a frequent hidden cause.
When Do You Need a Strut?
Not every door needs added bracing, but several clear triggers tell you reinforcement is overdue. From 15 years of GTA service calls, these are the situations where I recommend a strut:
1. You Just Added an Automatic Opener
This is the number-one reason. Older doors that were operated by hand never had to absorb opener pull. The moment you bolt on a LiftMaster, Chamberlain, or Genie, the top section takes a concentrated load it was never designed for. Most opener manufacturers explicitly require a top strut on single-layer doors — check the operator manual. Skipping it can void the door warranty and damage both the door and opener.
2. The Top Edge Visibly Bows or Bends
Open the door slowly and watch the top section from inside. If the center of the top edge curls outward (toward you) as it starts to lift while the ends stay pinned by the rollers, the panel is flexing. Left unchecked, repeated flexing fatigues the steel, cracks the paint, and eventually leaves a permanent bow.
3. The Door Is Wide (14 ft and Up)
The wider the section, the longer the unsupported span and the more it wants to sag or flex in the middle. Current 15x7 and 16x7 double doors need appropriate bracing; existing 18x7 doors may require multiple struts, but Royal Garage Doors no longer quotes or installs that size. If you are planning a new double door, ask whether struts are included in the build.
4. Single-Layer (Non-Insulated) Steel Doors
A single skin of thin steel is far more flexible than a sandwich panel. Insulated steel doors with a polyurethane or polystyrene core and a back skin are inherently rigid and often need only the top strut. Non-insulated doors usually need more.
5. Wind-Load or Code Requirements
Manufacturers publish wind-load reinforcement charts. For exposed sites, lakefront properties, or doors near open fields, the chart may call for a strut on every section plus heavier-gauge bars. Always follow the manufacturer's door safety and reinforcement guidance for your wind zone.
How Many Struts and What Size?
The right count and gauge depend on door width, whether it is insulated, and your wind zone. Use the table below as a starting point, then confirm against your door manufacturer's reinforcement chart.
| Door Width / Type | Typical Strut Count | Common Gauge | Profile |
|---|---|---|---|
| 8–9 ft single, insulated | 1 (top section) | 18–20 ga | 2 in U-bar |
| 8–10 ft single, non-insulated | 1–2 (top + center) | 18 ga | 2–2.5 in U-bar |
| 16 ft double, insulated | 2 (top + bottom) | 16–18 ga | 2.5–3 in U-bar |
| 16–18 ft double, non-insulated | Every section | 16 ga | 3 in U/box |
| High wind zone (any width) | Per wind chart | 14–16 ga | 3 in box-section |
Reading Strut Sizing
- Gauge: the steel thickness. Lower number = thicker, stiffer steel. 14 gauge is much stronger than 20 gauge.
- Profile height: taller U or box profiles (3 in) resist bending far better than short 2 in profiles. Height matters more than width for stiffness.
- Length: the strut must span the full section and land on the end stiles. Cut-to-width struts are common; never use one shorter than the panel.
How to Add a Strut (Step by Step)
Adding a strut to a section while the door is closed and fully supported is a moderate DIY job. The critical safety rule: never touch, loosen, or work near the springs, and never remove the door from its tracks. Here is the safe sequence:
- Confirm balance first. Pull the red emergency release, lift the door to waist height, and let go. A balanced door stays put. If it slams down or flies up, stop — you have a spring problem to fix before any strut work.
- Close the door fully so the target section is vertical and resting flat, supported by the tracks.
- Measure the section width between the inside faces of the end stiles and cut or order the strut to length.
- Position the strut horizontally across the section, centered top-to-bottom on the panel, aligned with the vertical stiles.
- Fasten into the stiles. Use the door maker's self-tapping screws driven into the end stiles and every intermediate stile. Screw into the reinforced stile metal, not the thin face skin alone, or the strut will pull through.
- Re-engage the opener and cycle the door slowly several times, watching that the panel now stays flat and nothing rubs the tracks.
For top-section installs where the opener bracket also attaches, the strut and the opener reinforcement bracket often share the same fasteners — follow the opener manual so the arm bolts through both the strut and the bracket for maximum strength.
Strut Cost and Professional Reinforcement in the GTA
A residential strut bar itself is inexpensive — the value is in correct sizing and a safe install. At Royal Garage Doors, we most often add struts as part of a broader service rather than a standalone trip, because the door usually benefits from a full check at the same time.
- Added during a maintenance tune-up: our tune-up package runs $120 + tax and includes lubrication, balance check, sensor alignment, and hardware tightening — the ideal time to add a top strut.
- During opener installation: when we install a new opener (openers from $600 + tax), we add the required top strut to single-layer doors so the door and opener are protected from day one.
- With a new door: a new supply-and-install door from $1,350 + tax comes pre-engineered with the correct struts for its width and wind rating.
Ontario's cold, wind, and freeze-thaw cycles are hard on doors — metal stiffens in winter and any existing flex gets worse. Reinforcing the top section before installing an opener is one of the smartest small upgrades a GTA homeowner can make. Whether you are in Mississauga, Toronto, or anywhere across the region, our Mississauga-based team can assess and brace your door correctly.
Key Takeaways
- A strut stiffens a section against bowing — it does not lift the door (springs do that).
- Add a top strut any time you fit an automatic opener to a single-layer door.
- Wider and non-insulated doors need more struts; follow the manufacturer wind chart.
- Lower gauge and taller profile = stiffer strut. The top section is the priority spot.
- Always pass the manual balance test before adding any reinforcement.
Top Section Bowing or Opener Straining?
If your door flexes as it opens, or you just added an opener to a single-layer door, our IDEA Certified technicians can add the correct strut and rebalance the door. Royal Garage Doors offers FREE service calls with any repair across Toronto & GTA.
Call 437-265-9995