To adjust garage door opener force, find the open force and close force dials on the side or back of the motor head. Turn a dial clockwise to add power or counterclockwise to make it more sensitive to obstructions. Change one dial about an eighth of a turn at a time, test the door, and run the safety reverse test after every change. If the door needs a lot of force to move, fix the springs or rollers first — do not mask a mechanical problem with extra force.
What Is Garage Door Opener Force Adjustment?
Force adjustment controls how much pulling and pushing power the opener applies to lift and lower the door, along with the sensitivity threshold at which the opener decides it has hit an obstruction and reverses. Open force governs the up direction and close force governs the down direction. The goal is the minimum force that reliably moves the door while still reversing instantly on contact.
A garage door that stops halfway, reverses just before it closes, or strains and shudders at the end of travel is one of the most common service calls we field across Toronto and the GTA. Nine times out of ten the homeowner reaches for the force dials — sometimes correctly, sometimes covering up a spring problem that will get worse. This guide explains exactly what force and sensitivity do, how to set them on every major brand, and the safety tests you must never skip.
Force vs Sensitivity: What They Actually Control
People use “force” and “sensitivity” interchangeably, but understanding the relationship saves you from chasing the wrong setting. On most residential openers, force and sensitivity are two sides of one control: the opener compares the power it is using against a learned baseline, and if the door suddenly demands more power than expected, it interprets that as an obstruction and reverses.
Open force vs close force
Every modern opener has two separate force settings:
- Open (up) force: How hard the motor pulls the door up. Too low and the door stalls or reverses partway up; too high and the opener can lift a door even when something is trapped under it.
- Close (down) force: How hard the motor pushes the door down. Too low (too sensitive) and the door reverses before it seals; too high and the door can keep closing on an obstacle instead of reversing.
How sensitivity ties in
On openers with a single dial per direction, lowering the force makes the opener more sensitive — it reverses on the slightest resistance. Raising the force makes it less sensitive. Some newer LiftMaster and Chamberlain models separate the two, giving you a force dial for raw motor power and a distinct obstruction sensitivity adjustment in the wall console or app. If your door drives a chain or belt, the same logic applies; the only difference is how smoothly the motor delivers that force.
If you are not sure your opener motor itself is healthy — for example it hums but barely moves — force settings will not fix it, and you may need professional garage door opener repair instead.
Diagnose Before You Touch the Dials
Force adjustment fixes a narrow set of problems. Adjusting it to compensate for a mechanical fault is the single most common mistake we see, and it is dangerous because it disables the opener’s built-in safety reversal. Work through this checklist first.
- Run a balance test. Pull the red emergency release cord, lift the door by hand to waist height, and let go. A balanced door stays put. If it slams down or shoots up, the springs are out of balance and no force setting will make the door safe.
- Check the safety sensors. A door that reverses just before closing is far more often a sensor problem than a force problem. Confirm both photo-eye lights are solid. Our guide to aligning garage door safety sensors walks through this.
- Inspect rollers and tracks. Worn rollers or a slightly bent track create binding that the opener reads as an obstruction. Replacing dry, cracked rollers (see garage door roller replacement) often cures a door that “needs more force.”
- Lubricate. Dry hinges, rollers, and the torsion shaft add resistance. A few minutes with proper lubricant can drop the force requirement enough that no dial change is needed.
- Verify the travel limits. If the door reverses at the floor, the down limit may be set too far, jamming the door into the floor and tripping the force reversal. Travel limits and force are separate adjustments.
Match the Symptom to the Right Adjustment
Use this table to point yourself at the correct fix before turning anything. The wrong adjustment can make a safe door unsafe.
| Symptom | Likely Cause | Correct Action |
|---|---|---|
| Door reverses just before closing | Close force too sensitive, OR misaligned sensors | Check sensors first; then raise close force slightly |
| Door stalls or reverses partway up | Open force too low or weak/broken spring | Balance test first; raise open force only if balanced |
| Door slams down hard, no reversal on obstacle | Close force set too high | Lower close force, then run reverse test |
| Motor hums and strains at end of travel | Force too high or travel limit too far | Lower force; check down limit |
| Door won’t move at all but motor runs | Stripped gear, broken trolley, or snapped spring | Stop — mechanical repair needed, not force |
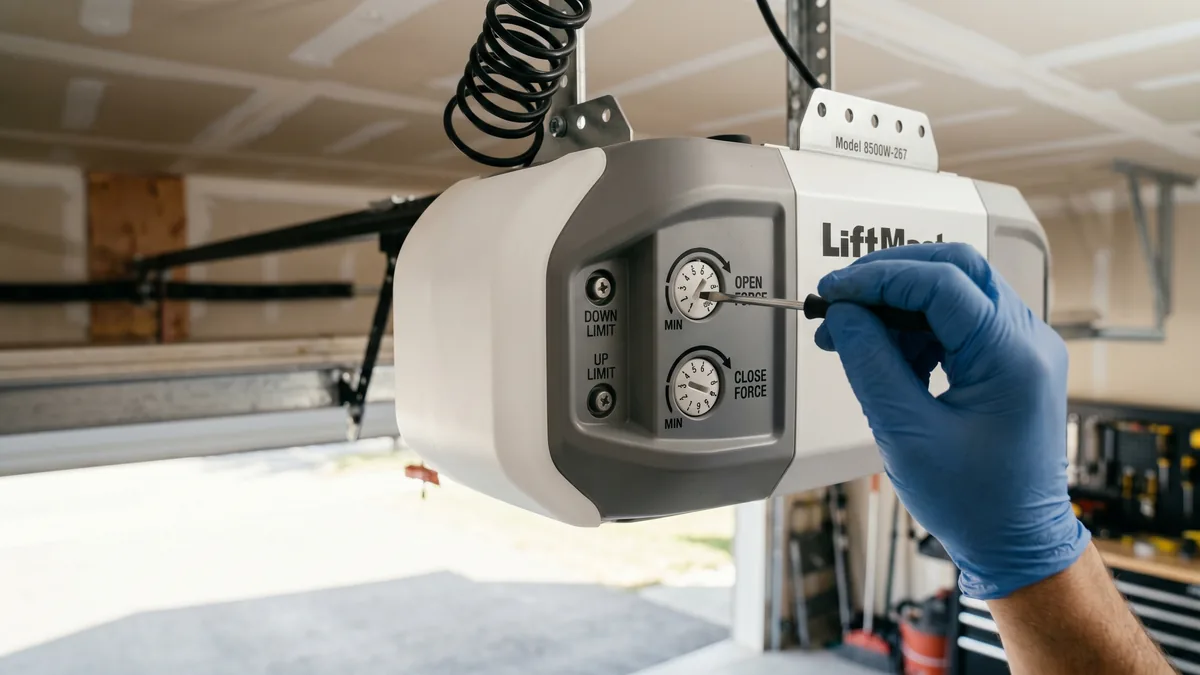
LiftMaster and Chamberlain Force Adjustment
LiftMaster and Chamberlain are the same manufacturer, so their force controls work almost identically. On most chain and belt drive motor heads, the open force and close force dials sit on the back or side panel, sometimes hidden behind the light lens cover.
- Pop off the light lens or open the rear cover to expose the two dials marked UP FORCE (or OPEN) and DOWN FORCE (or CLOSE).
- Make small changes — about an eighth of a turn. Clockwise increases force; counterclockwise decreases force and increases sensitivity.
- Door reverses before closing: turn the DOWN FORCE dial slightly clockwise so the opener tolerates the normal weight of the door.
- Door stalls going up: turn the UP FORCE dial slightly clockwise — but only after a clean balance test.
- Cycle the door fully open and closed after every adjustment, standing clear of its path.
- Finish with the safety reverse test (below). If the door no longer reverses on contact, you have added too much force — back the dial off.
Many newer LiftMaster models with a smart wall console also let you set the door close behaviour and check status through the app. If you are setting up app features at the same time, our guide to connecting a garage door opener to WiFi covers the pairing steps.
Genie and Craftsman Force Adjustment
Genie openers vary more by generation, but the principle is unchanged. Older screw-drive Genie units use limit and force dials or potentiometers on the power head; newer ChainGlide and SilentMax models use clearly labelled UP FORCE and DOWN FORCE adjustments on the end panel.
- Genie ChainGlide / SilentMax: locate the force adjustment screws on the end panel near the limit screws. Turn clockwise for more force, counterclockwise for more sensitivity, in small increments.
- Older Genie Pro / IS-Series: use the labelled force dials on the logic board cover; consult the model manual for exact positions.
- Craftsman: most Craftsman openers are Chamberlain-built, so follow the LiftMaster process above — the dials are typically on the side panel.
The Safety Reverse Test You Must Run Every Time
Since 1993, every residential opener sold in North America must reverse when it contacts an obstruction. In Ontario this is part of how a compliant, UL 325–listed opener is expected to behave, and it is the entire reason force settings exist. After any force change, prove the safety still works:
- Lay a flat 2x4 (laid flat, about 1.5 inches tall) on the floor in the centre of the door opening.
- Press the wall button to close the door.
- When the door bottom touches the board, it must stop and reverse within about two seconds. If it does not, the close force is too high — lower it and retest.
- Repeat the photo-eye test: with the door closing, wave an object through the sensor beam. The door must reverse immediately.
If you cannot get the door to both seal at the floor and pass the reverse test, the problem is mechanical, not electrical. That is the point to call a technician rather than keep turning dials. You can read manufacturer safety guidance directly from LiftMaster’s safety resources and the broader industry standards from the International Door Association.
Key takeaways
- Force is about safe motion, not raw power — use the least force that works.
- Always balance-test the door and check sensors before adjusting force.
- Adjust in small steps (about an eighth turn) and test after each one.
- Run the 2x4 safety reverse test after every change, without exception.
- Creeping force demand means it is time for a tune-up or spring service.
Door Still Reversing or Straining?
If force adjustments don’t solve it, you likely have a spring balance issue, worn rollers, or a failing logic board. Royal Garage Doors provides FREE service calls with any repair across Toronto & the GTA — same-day appointments available.
Call 437-265-9995