The only safe way to bypass garage door sensors is to press and hold the hard-wired wall control button until the door reaches the floor. UL 325 compliant openers allow this “constant-pressure” close override while you stand and watch the door — remotes and keypads will not. The moment you let go, the door stops. This is a temporary measure only: permanently disabling the photo-eye sensors is unsafe, illegal under the 1993 safety law, and can void your insurance. Clean and realign the sensors as soon as possible.
What Are Garage Door Safety Sensors?
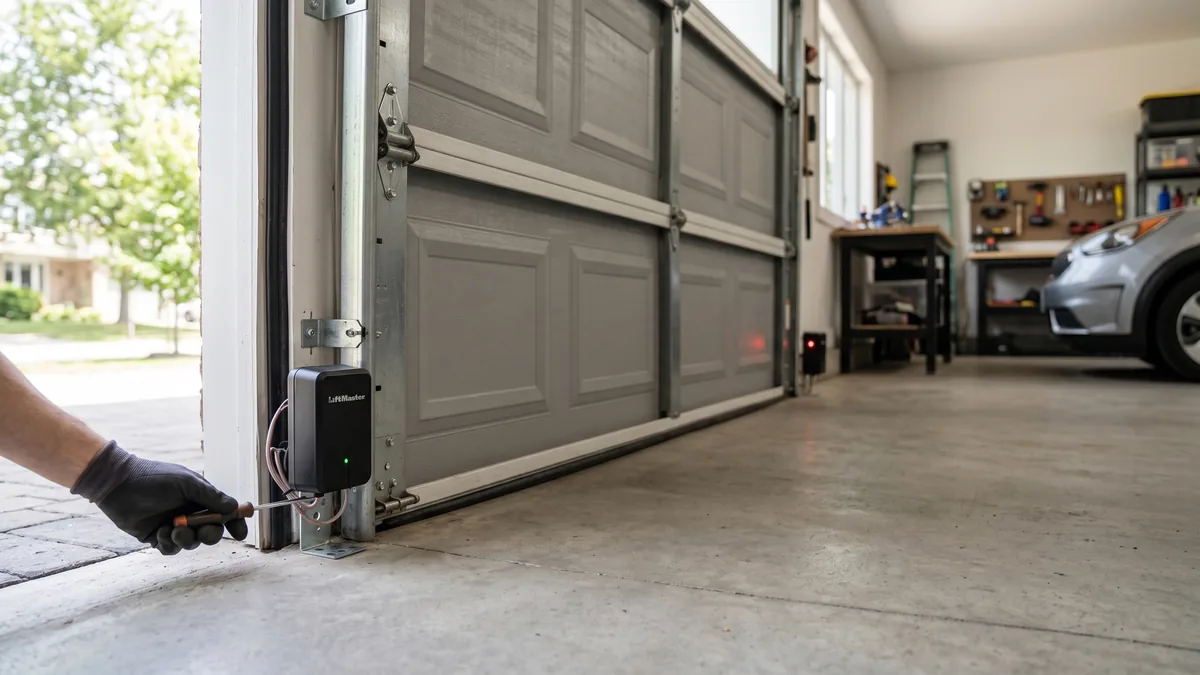
Garage door safety sensors — also called photo-eyes or photoelectric sensors — are a pair of small units mounted about 4–6 inches above the floor on each side of the door track. One unit transmits an invisible infrared beam to the other. If anything breaks that beam while the door is closing, the opener immediately stops and reverses the door. They are the primary defence against a closing door crushing a child, pet, or vehicle.
A flashing opener light and a door that refuses to close is one of the most common calls we get across Mississauga, Toronto, and the wider GTA — especially in winter when frost and road salt coat the lenses. Before you reach for tape or wire to “trick” the sensors, it’s worth understanding what you’re actually overriding and how to do it without putting your family at risk.
How Garage Door Sensors Work (and Why They Trip)
Every residential garage door opener sold in North America since January 1, 1993 is required by federal law and the UL 325 safety standard to include an external entrapment-protection device. In nearly all cases that device is the photo-eye sensor pair. One sensor (the transmitter, often with an amber or yellow LED) sends an infrared beam straight across the opening to the receiver (usually with a green LED).
When both sensors “see” each other, their lights glow steady and the door will close normally. When the beam is interrupted — or the sensors lose alignment with each other — the receiver light blinks, the opener refuses to close from the remote, and the overhead light flashes 10 times as a warning. People assume the sensors are “broken,” but most of the time nothing is wrong with the closing mechanism at all. Common reasons sensors trip with nothing in the way include:
- Misalignment: A bump from a bike, snow shovel, or garbage bin knocks a sensor off-axis so the beam misses the receiver.
- Dirty or fogged lenses: Dust, cobwebs, exhaust film, or winter condensation block the beam.
- Sun glare: Low afternoon sun shining directly into the receiver can wash out the infrared signal.
- Loose brackets: Vibration over the years lets a bracket sag.
- Damaged or pinched wiring: Rodents, staples, or a snagged wire interrupt the low-voltage circuit.
- GTA winter factors: Frost, ice, and road salt splash are the leading seasonal triggers we see between November and March.
The takeaway: a tripped sensor is usually a 5-minute alignment or cleaning job, not a reason to permanently disable a life-safety device. For a step-by-step fix, see our guide on how to align garage door safety sensors.
The Only Safe Way to Bypass: Constant-Pressure Close
There is exactly one method that lets you close a door past tripped sensors without defeating the safety system permanently: the constant-pressure override built into your wall-mounted control. UL 325 deliberately allows the hard-wired wall button to close the door even when the photo-eyes are blocked — but only while a human is physically holding the button and watching.
Step-by-Step: Closing the Door Safely With Sensors Tripped
- Clear the opening. Make sure no people, pets, or objects are anywhere near the door path. This is non-negotiable — you are removing the automatic safety stop.
- Go to the wall control, not the remote. Only the hard-wired wall button (or some smart wall panels) has the constant-pressure feature.
- Press and hold the button. Keep firm, continuous pressure on it.
- Watch the door travel all the way down. Do not look away. If anything enters the path, release the button instantly and the door stops.
- Hold until the door is fully closed and seated on the floor, then release.
Why You Should Never Permanently Disable the Sensors
It is technically possible to defeat the photo-eyes — people zip-tie the two sensors face-to-face, jumper the terminals, or point them at a wall. As an IDEA Certified technician with 15+ years in the field, I strongly advise against all of these. Here’s what’s at stake.
Safety and Legal Risk
Photo-eye sensors became mandatory after a series of child entrapment deaths in the late 1980s and early 1990s. The U.S. Consumer Product Safety Commission and the UL 325 standard now require them on every residential opener. A garage door panel weighs well over 100 lbs, and the motor pulls it down with real force. Without working sensors, the only backup is the opener’s auto-reverse force setting — which is far slower to react than a beam and is not designed to be the sole line of defence.
Insurance, Warranty, and Resale
If a disabled-sensor door injures someone, your home insurer can deny the claim on the grounds that you removed a required safety device. Manufacturer warranties are also voided when safety equipment is tampered with. And in Ontario, a non-compliant door frequently gets flagged during a pre-sale home inspection, becoming a negotiating point that costs you far more than a sensor repair would have. For a deeper look at the rules, read our overview of UL 325 garage door opener safety.
| Approach | Safe? | Legal/Compliant? | Best For |
|---|---|---|---|
| Constant-pressure wall button | Yes (supervised) | Yes – UL 325 allows it | One-time emergency close |
| Clean & realign sensors | Yes | Yes | The real fix (most cases) |
| Replace faulty sensors | Yes | Yes | Damaged/dead sensors |
| Jumper / zip-tie sensors together | No | No – defeats UL 325 | Never — do not do this |
| Point sensors at a wall | No | No | Never — do not do this |
The Real Fix: Realign, Clean, or Replace Your Sensors
In the vast majority of cases, what looks like a sensor failure is solved in under 15 minutes. Work through these steps before considering replacement.
1. Clean the Lenses
Wipe both sensor lenses gently with a soft, dry microfiber cloth. Avoid harsh cleaners or paper towels that scratch. In winter, gently clear any frost or condensation — a major GTA culprit.
2. Check the LED Lights
Look at both sensors. Typically the transmitter LED (often amber) should be solid whenever the opener has power. The receiver LED (often green) should be solid only when it is correctly aligned and sees the beam. If the receiver light is off or blinking, you have an alignment or wiring issue.
3. Realign the Sensors
- Loosen the wing nut on the misaligned sensor bracket just enough to move it.
- Gently tilt and slide the sensor until the receiver LED glows steady.
- Confirm both sensors sit at the same height (4–6 inches off the floor is standard).
- Retighten the wing nut without nudging the sensor out of position.
4. Inspect the Wiring
Follow the low-voltage wire from each sensor back toward the opener. Look for staples cutting into the insulation, chew marks, or disconnected terminals. Repair or reconnect as needed.
5. Test
Close the door normally from the remote. If it now closes without holding the wall button, you’ve fixed it. If the sensors are physically cracked, water-damaged, or the LEDs stay dark with good wiring, they need replacement — a quick job covered in our photo-eye sensor replacement guide.
When to Call a Professional in the GTA
DIY cleaning and realignment is well within reach for most homeowners. Call a technician when:
- The receiver light stays dark even after cleaning, realigning, and checking wiring.
- The door reverses partway down even when the sensors read aligned — this points to a force/auto-reverse or logic-board issue, not the sensors.
- The wiring is damaged inside the wall or you’re uncomfortable working with low-voltage connections.
- The door is heavy, drops on its own, or strains — that is a spring problem, not a sensor problem. See our guide on a broken garage door spring.
- You’ve been relying on the constant-pressure override for days — that is a clear sign the real fault still needs fixing.
At Royal Garage Doors, sensor repair or replacement typically runs $120–$180 + tax, and an alignment is often handled at no charge during a free service call when bundled with another repair. We carry matched sensors for all major brands and service Toronto, Mississauga, Brampton, Vaughan, and the entire GTA the same day. See current pricing on our pricing page or learn more about us on the company page.
Sensors Still Won’t Cooperate?
If cleaning and realigning don’t restore normal closing, don’t rely on the wall-button override for long. Royal Garage Doors provides FREE service calls with any repair across Toronto & the GTA, with matched sensors for every major brand.
Call 437-265-9995