A garage door cable drum is the grooved spool at each end of the torsion shaft that winds the lift cable to raise and lower the door. Replace a drum when it is cracked, has worn grooves, throws the cable off, or has stripped set screws that let it spin without lifting. Because the drum sits directly beside a torsion spring under extreme tension, this is not a DIY repair. In the GTA it is usually billed with the cable and bracket work at $180–$220 + tax, and both drums are replaced as a matched pair.
What Is a Garage Door Cable Drum?
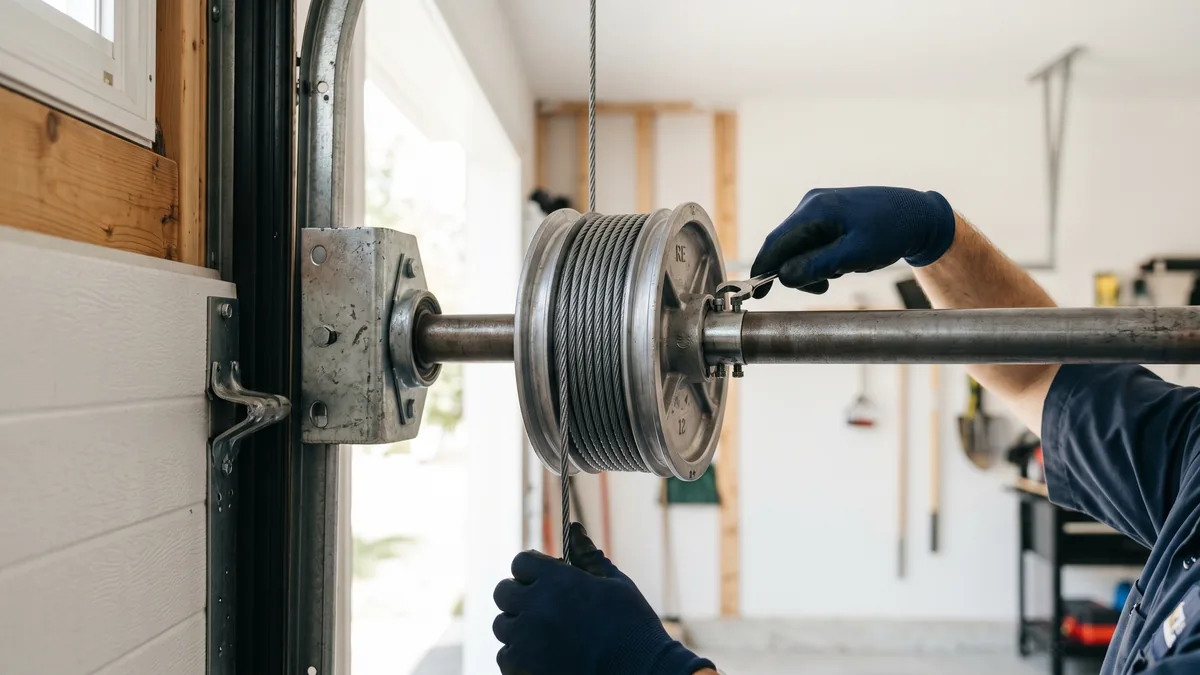
A cable drum is a cast-aluminum or steel spool, roughly the size of a fist, mounted on the torsion shaft at each top corner of the door — one on the left, one on the right, right next to the springs. Each drum has a spiral groove that the lift cable wraps into. As the torsion spring turns the shaft, the drums wind the cables up to lift the door and unwind them to lower it. The two drums must be a matched left-and-right pair, sized to the door’s height and weight, so both sides rise at exactly the same rate.
When homeowners across Toronto and the GTA call about a door that opens crooked, jams in one corner, or keeps throwing its cable, the cause often traces back to a small part most people have never heard of: the cable drum. It is a quiet workhorse that cycles thousands of times a year, and when its grooves wear or its set screws strip, the whole balanced system starts to fail. Here is exactly what a cable drum does, how to spot a bad one, how a technician replaces it safely, and what it costs in 2026.
What a Cable Drum Does and How It Works
To understand why a worn drum is such a problem, it helps to see how the lifting system fits together. A torsion-spring garage door has four key parts working as one balanced unit: the springs, the torsion shaft they sit on, the cable drums mounted at each end of that shaft, and the lift cables that run down to the bottom brackets.
When the door is down, the springs are fully wound and the cables are wrapped tightly around the drums. When the opener (or your hand) starts to lift the door, the wound springs unwind and turn the shaft. The drums turn with the shaft, and their spiral grooves reel in the cables, pulling the bottom of the door upward. Lower the door, and the process reverses — the cables pay back out along the grooves while the springs re-wind. Because both drums are an identical mirrored pair, they wind at the same speed and the door rises perfectly level.
That balance is the whole point. A cable drum with worn or chipped grooves no longer feeds the cable cleanly, so one side lags, the door cocks, and the cable can pop out of its track. For a closer look at how the cables themselves fail, see our guide on a garage door cable that came off the drum.
Standard vs. High-Lift Drums
Not all drums are the same. The right drum depends on how your door travels and how tall it is:
- Standard-lift drums (often coded 400-series, like the common 4" flat drum) fit typical residential doors up to about 8 feet tall where the tracks curve back at ceiling height.
- High-lift and full-vertical drums have a tapered or stepped groove and are used on garages with extra headroom, on commercial units, and on doors taller than 8 feet, so the cable can travel a longer vertical distance.
- Commercial / heavy-duty drums are larger and rated for far more cycles, matched to high-cycle springs on busy doors. We cover these in our note on high-cycle springs for commercial doors.
Fitting the wrong drum — a standard drum on a tall door, or a mismatched pair — is one of the most common causes of repeat cable problems, which is why drum sizing is best left to a technician with the door’s specs in hand.
Signs Your Garage Door Cable Drum Is Failing
A drum rarely fails overnight; it usually gives you weeks of warning if you know what to look for. Watch and listen for these symptoms — most show up before the cable actually snaps.
1. The Door Opens Crooked or Sticks on One Side
If one top corner lags behind the other, or the door binds and jams on a single side, one drum is feeding its cable unevenly. A worn groove changes how fast that cable winds, throwing the door out of level.
2. The Cable Keeps Slipping Off or Jumping the Groove
A cable that repeatedly works its way out of the drum, or that you can see has slack on one side while the door is down, points to a worn drum face or a loose drum that has crept along the shaft. Re-seating the cable is only a temporary fix if the groove itself is chewed up.
3. Visible Cracks, Chips, or Grooving in the Drum
Look at each top corner. Cast-aluminum drums can crack at the hub or chip along the rim, and years of cable pressure can carve a deeper-than-spec groove. Any visible crack means the drum can let go under load — replace it.
4. Grinding, Clicking, or Popping Near the Top Corners
A healthy drum is nearly silent. A grinding or sharp clicking from one corner as the door moves usually means the cable is riding rough grooves or the drum is slipping a fraction on the shaft with each cycle.
5. Frayed Cable Right at the Drum
When a drum’s grooves wear sharp, they shred the cable that rides in them. Frayed strands near the top of the door are a red flag that the drum — not just the cable — needs attention. A frayed cable is on the edge of snapping; read the warning signs in our broken cable guide and our broken garage door cable service page.
6. The Drum Spins Without Lifting the Cable
Each drum is locked to the shaft by two set screws bearing on a flat. If those screws strip or back out, the shaft turns but the drum slips, so the cable barely moves — the door crawls up unevenly or not at all on that side. This is a hard mechanical failure that needs a new drum and proper torque on fresh set screws.
How a Garage Door Cable Drum Is Replaced
The replacement itself is straightforward for a pro, but every step depends on first taking the dangerous energy out of the system. Here is the sequence we follow on a standard torsion-spring door. This is presented so you understand the work — not as a DIY instruction.
- Secure the door and release spring tension. Clamp the door to the track with locking pliers so it cannot move, then use proper winding bars to fully unwind the torsion spring until all tension is off the shaft and drums.
- Free the lift cable. With the spring unloaded, loosen the drum’s set screws, lift the cable out of its slot in the drum, and unhook it from the bottom bracket.
- Remove the worn drum. Slide the bearing or loosen the end bracket so the old drum can come off the torsion shaft.
- Fit the matched replacement drum. Install the correct size and hand of drum, seat the cable end in the slot, and slide it back onto the shaft snug against the bearing plate. Both drums are swapped as a pair.
- Wind the cable and tension the spring. Hold tension on the cable, torque the set screws onto the shaft flat, then wind the spring to the manufacturer’s specified number of turns with winding bars.
- Balance test and fine-tune. Remove the clamps, cycle the door, and confirm it stays put when raised halfway. Adjust each drum’s cable tension until the door sits dead level.
A clean drum replacement on a residential door usually takes 45–60 minutes. Industry training and safety standards for this hardware come from the Door & Access Systems Manufacturers Association — you can review their public homeowner safety material at DASMA.com.
Garage Door Cable Drum Replacement Cost in the GTA
Because the drum, cable, and brackets are serviced together, cable drum replacement is normally priced as part of the cable-and-bracket repair rather than as a stand-alone line item. Here is what the related work runs across Toronto, Mississauga, Brampton, Hamilton, and the rest of the GTA in 2026:
| Service | Typical Cost (CAD) |
|---|---|
| Cables & brackets (incl. drum service) | $180–$220 + tax |
| With bottom brackets replaced | $260 + tax |
| Single torsion spring (if damaged) | from $280 + tax |
| Double spring setup (both springs) | $320–$460 + tax |
| Per spring (commercial / multi-spring) | $160 / spring |
| Torquemaster conversion to torsion | $530 + tax |
| Maintenance & tune-up | $100–$120 + tax |
Two things keep the bill predictable. First, the service call is FREE with any repair — you only pay the $120 diagnostic fee if you decide not to proceed after the assessment. Second, all of our pricing includes parts and labour with no hidden charges and no weekend or holiday surcharge. Every repair is backed by our standard warranty: 1-year labour and 5-year hardware coverage. For the full, current list see the garage door pricing page, and for spring-specific numbers our spring replacement cost guide.
Drum Replacement vs. Whole-System Repair
Homeowners often ask whether they should just replace the drum or address the whole lifting assembly. The answer depends on what the inspection finds:
| Scenario | Recommended Work | Why |
|---|---|---|
| One cracked drum, cables and springs healthy | Replace both drums (matched pair) | Keeps the door level; the other drum is the same age |
| Drum worn + cable frayed | Drums + new cables | Worn grooves shred new cable; do both at once |
| Drum slipping + spring near end of life | Drums + spring replacement | Spring is already unloaded; avoids a second visit |
| Old door, multiple worn parts | Consider full hardware refresh | More cost-effective than serial repairs |
How to Make Your Cable Drums Last Longer
Cable drums are rated in cycles, just like springs — typically 10,000 to 15,000 on standard hardware, which is roughly 7 to 12 years of normal use. Our GTA freeze-thaw winters are tough on metal parts, but a little routine care stretches that lifespan and catches trouble early.
- Keep the cables and drums lightly lubricated. A garage-door or silicone lubricant on the bearings and cable line reduces friction and rust at the drum face. Avoid WD-40, which is a degreaser, not a lubricant.
- Check cable seating during routine maintenance. Make sure the cable sits cleanly in the groove with no slack on either side when the door is down.
- Don’t ignore a crooked door. The moment one corner starts lagging, have it looked at — correcting tension early prevents the drum from chewing the cable.
- Replace drums as a pair, not one at a time. Matched wear keeps the door balanced and saves a repeat visit.
- Book an annual professional tune-up. Our tune-up includes a cable, drum, spring, and balance inspection — the parts you should never service yourself.
When to Repair vs. When It Signals a Bigger Job
If your door is otherwise sound, drum and cable service is a quick, affordable fix that restores years of life. But if the drums are failing alongside worn springs, rusted tracks, and aging panels, it may be smarter to look at a full garage door replacement or a new overhead door. A complete supply-and-install starts from $1,350 + tax for an 8×7 door, and we can advise honestly on which path makes sense for your home. If a damaged opener is part of the picture, our opener repair team can handle that on the same visit.
Crooked Door or Cable Off the Drum?
A failing cable drum puts the whole door out of balance and can snap a cable without warning — not a safe fix to attempt yourself. Royal Garage Doors provides FREE service calls with any repair across Toronto, Mississauga, Brampton, Hamilton & the GTA, with same-day appointments available.
Call 437-265-9995