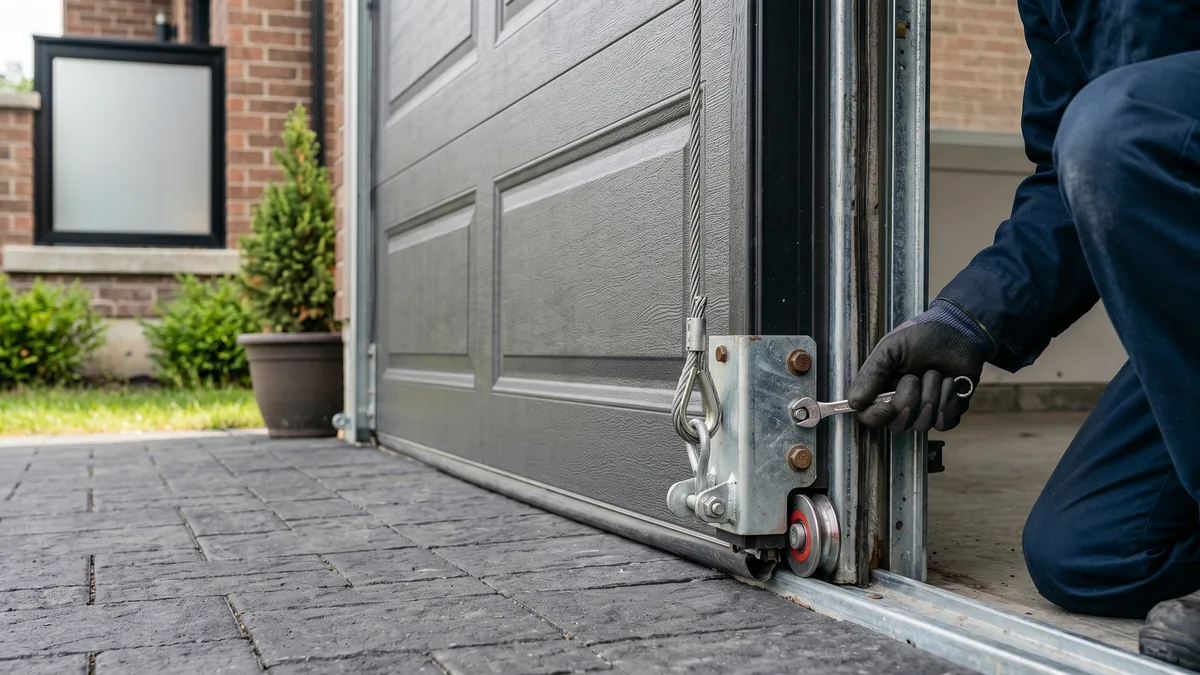
The garage door bottom bracket is the metal fixture at each bottom corner of the door that holds the bottom roller and anchors the lift cable. Because the cable carries the full force of the springs, this bracket is one of the highest-tension parts on the door. Replacing it safely means first opening the door fully so the springs unwind and the cables go slack, then clamping the door, swapping the bracket, and re-balancing. If the springs are wound, do not loosen the bracket — call a technician.
What Is a Garage Door Bottom Bracket?
The bottom bracket (also called the bottom fixture) is a stamped or formed steel bracket bolted to the lower corners of a sectional garage door. It serves two jobs at once: it holds the bottom roller stem that rides in the vertical track, and it anchors the looped end of the lift cable that runs up to the spring drum or extension spring. Every pound of counterbalance force the springs generate passes through these two small brackets — which is exactly why they must be treated with respect.
Of all the parts on a garage door, the bottom bracket is the one homeowners most often underestimate. It looks like a simple piece of bent metal, but it is bolted to a cable under enough tension to lift a 150-pound door. Across Toronto and the GTA, our freeze-thaw winters and road salt rust these brackets from the bottom up, and a corroded one can let the cable slip with no warning. Here is exactly how the bottom bracket works, how to tell when yours is failing, how a replacement is done safely, and what it costs.
What the Bottom Bracket Does and Why It Is High-Tension
On a sectional door, the springs do the heavy lifting, but they do not touch the door directly. Instead, torsion springs wind a shaft that turns two cable drums, and the lift cables run from those drums straight down to the bottom brackets. On extension-spring systems, the cable runs through a pulley and anchors the same way. Either configuration means the bottom bracket is the single point where all of that stored spring energy connects to the door itself.
That is the key safety fact: the bottom bracket is under load whenever the springs are wound. Loosen its bolts while the door is closed and the cable will whip free with serious force. This is the same hazard we warn about with broken garage door springs and snapped cables — the bracket sits right in the middle of that high-tension chain.
Signs Your Bottom Bracket Needs Replacing
A bottom bracket rarely fails overnight — it usually gives warning signs first. Catching them early prevents the cable from coming off and turning a small repair into a damaged-panel job.
- Visible rust or corrosion. GTA road salt and humidity eat the zinc coating, and once the steel rusts the bracket weakens. Rust concentrated at the cable loop is the most urgent.
- Cracks or bending. A bracket that is splayed, cracked at a bolt hole, or bent out of shape is no longer holding the cable at the right angle.
- Cable fraying near the bracket. If the cable keeps slipping off or shows broken strands where it loops into the bracket, the fixture is worn or misaligned.
- Elongated or stripped bolt holes. Years of cycling can wallow out the holes where the bracket bolts to the panel, letting it shift under load.
- A sagging or uneven bottom corner. If one corner of the door sits lower or the bottom seal no longer meets the floor evenly, the bracket may be pulling away.
- Grinding or popping from the bottom roller. A failing bracket also throws the bottom roller out of alignment, so listen for a new noise at the start of travel.
Bottom Bracket Types and Hardware
Not all bottom brackets are interchangeable. Replacing yours starts with matching the correct type, gauge, and cable connection. Royal Garage Doors stocks and installs brackets compatible with all the major brands we sell and service — including Wayne Dalton and the doors covered in our Clopay vs. Wayne Dalton comparison — so the replacement matches your door rather than forcing a generic part.
| Bracket Type | Found On | Cable Connection | Notes |
|---|---|---|---|
| Standard 14-gauge bottom bracket | Most residential sectional doors | Cable loops over a pin/stud | Most common; easy to source |
| Heavy-duty / commercial bracket | Heavier & commercial doors | Cable hooks into a slotted plate | Thicker steel for higher loads |
| Quick-turn / tamper-resistant bracket | Newer code-compliant doors | Enclosed cable retainer | Designed to limit DIY cable removal under tension |
| Integrated bracket + roller carrier | Some Wayne Dalton / branded doors | Brand-specific anchor | Replace with matching OEM part |
The tamper-resistant designs exist for a reason. DASMA, the door and access systems manufacturers association, has long flagged the bottom bracket as a high-risk component; you can read their consumer guidance at DASMA.com. If your door has a sealed or tamper-resistant bracket, that is a strong signal to leave the job to a pro.
How to Replace a Garage Door Bottom Bracket (Safely)
This is the procedure a trained technician follows. We are publishing it so you understand the work — but read the safety warning above first. If the springs are wound or you are unsure, this is a job for a professional appointment, not a weekend project.
- Relieve the tension. Raise the door fully so the springs unwind and the lift cables go slack. With the door at the top, the bracket is no longer pulling against spring force. Confirm the cable is visibly loose before touching anything.
- Clamp the door in place. Lock a pair of vise grips onto the track just below the bottom roller, on both sides, so the door cannot slide down while you work.
- Unhook the lift cable. With the cable slack, carefully lift the looped end off the bracket pin. Keep your fingers clear of the path the cable would take if it sprang back, and never let go of it under load.
- Remove the old bracket. Unbolt the bracket from the bottom corner of the panel with a socket wrench. Note the orientation and the bolt positions so the new one goes on identically.
- Install the matching bracket. Bolt the correct replacement bracket to the panel, snug but not overtightened, then seat the bottom roller stem into the bracket and track.
- Reattach the cable and inspect it. Loop the lift cable back onto the new bracket pin. Inspect the cable for fraying while you are there — if it is worn, replace it now (see why below).
- Remove the clamps and test. Take off the vise grips and cycle the door slowly. Confirm both cables stay seated, the door tracks evenly, and it stays put at the halfway balance point.
If the door no longer balances, the bottom corner still sags, or a cable jumps off, stop and call us. A bracket job that goes sideways can damage the panel, and panel repairs run $500–$1,000 + tax — far more than the bracket itself. See our panel replacement service if a corner is already damaged.
Why You Should Usually Replace the Cable Too
The cable end and the bottom bracket live in the same harsh spot — the very bottom of the door, closest to road salt, snowmelt, and standing water. That is why corrosion and fraying tend to hit both at once. When we replace a bottom bracket because it rusted or let the cable slip, the cable is almost always compromised as well.
Doing both together is also why our pricing pairs them. A cables-and-brackets job is one visit, one balance check, and one warranty — rather than calling us back a month later when the old cable finally frays through. If your cable has already jumped the drum, our cable came off guide explains what happened, and our drum replacement guide covers the part the cable winds onto.
Bottom Bracket Replacement Cost in the GTA
Bottom bracket work falls under our cables and brackets service. Here is what the related repairs typically cost across Toronto, Mississauga, Brampton, and the wider GTA, in Canadian dollars plus tax:
| Repair | Typical Cost (CAD) |
|---|---|
| Cables & brackets | $180–$260 + tax |
| Cables & brackets (with bottom brackets) | $260 + tax |
| Single torsion spring (if also replacing) | from $280 + tax |
| Maintenance & tune-up | $120 + tax |
| Panel replacement (if a corner is damaged) | $500–$1,000 + tax |
Every repair includes a FREE service call — you only pay the $120 diagnostic if you choose not to proceed after the assessment. Our work is backed by a 1-year labour and 5-year hardware warranty. For full, current pricing on every service, see our garage door pricing page, and read what GTA homeowners say on our reviews page.
The Bottom Line
A garage door bottom bracket is small but load-bearing — it anchors a cable under full spring tension. Watch for rust, cracks, and a cable that slips, and replace the bracket (and usually the cable) before it fails. The work itself is straightforward for a trained tech but genuinely hazardous if the springs are still wound. When in doubt, let a pro handle it.
Bottom Bracket Rusted or Cable Slipping?
Do not risk a high-tension cable. Royal Garage Doors replaces bottom brackets and lift cables safely across Toronto & the GTA — FREE service call with any repair, same-day appointments available.
Call 437-265-9995